There’s something about Halloween that brings out our inner child. The decorations, the costumes, and of course, the treats! Picture this: a crisp autumn evening, kids giggling as they rush from house to house, and in your own kitchen, you’re preparing a batch of Halloween Mummy Cookies.
Pair these with a spooky punch or set them alongside some classic caramel popcorn, and you’ll have a festive display that captures the essence of the season.

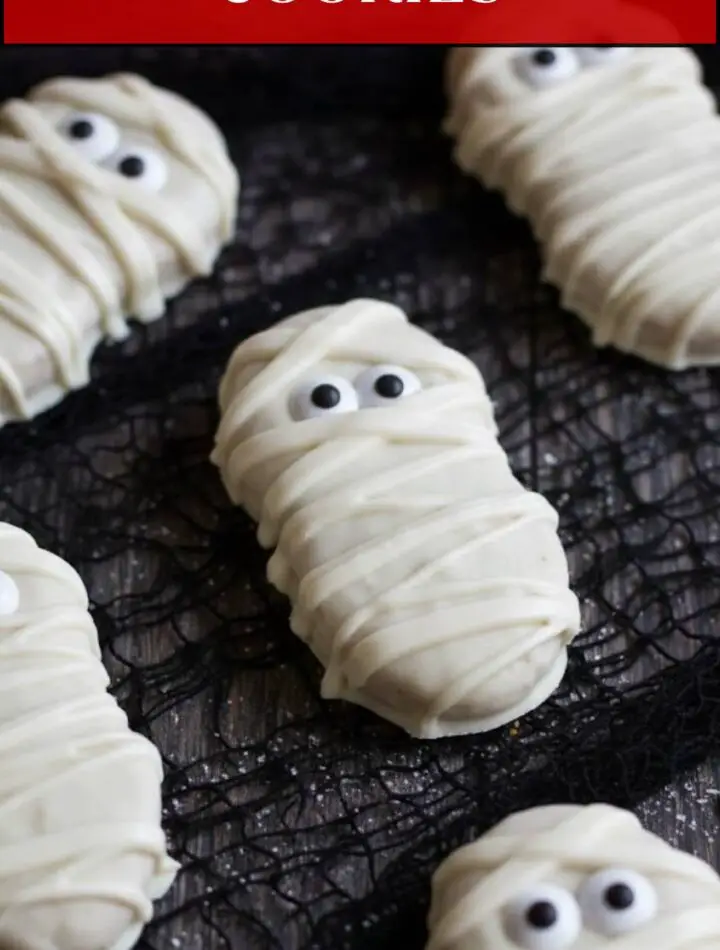
Halloween Mummy Cookies are one of my favorite festive treats. They’re fun to make, look adorable, and are perfect for gatherings. With a simple base of Nutter Butter cookies dressed up in ghostly white, they’re deceivingly easy to prepare and will quickly become a staple for any Halloween celebration.
You Might Like These Recipes!
What Are Halloween Mummy Cookies?
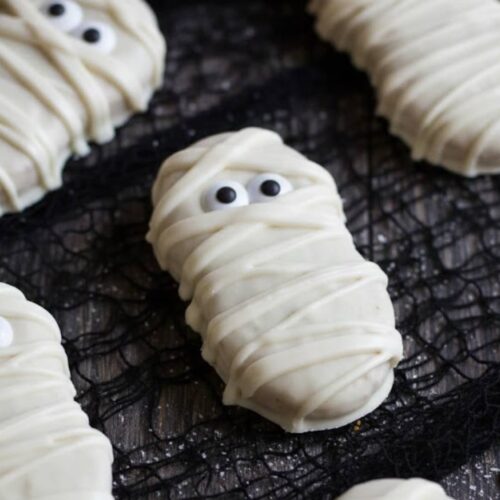
Halloween Mummy Cookies are sweet, cookie-shaped mummies that give off a playful vibe while being as delightful as they are cute. Coated in melted white candy melts, they mimic the appearance of wrapped mummies, complete with candy eyes that give them character. These cookies are as much a visual treat as they are a delicious snack.
Why You’ll Love These Halloween Mummy Cookies
The charm of Halloween Mummy Cookies lies in their delightful simplicity. They’re not just eye-catching but also incredibly easy to make. Kids love to help decorate, and they’re perfect for parties as they disappear quicker than you can say “trick or treat.” Plus, they offer a wonderful mix of textures: the crunch of the cookies combined with the smoothness of the chocolate creates a delightful snacking experience.
The Ingredients

To whip up these delightful treats, you’ll need the following ingredients:
– 20 Nutter Butter cookies
– 1 bag of white candy melts
– 40 mini candy eyes (or use round sprinkles)
– 1 tablespoon of coconut oil (to add a smooth texture to your candy melts)
– 1 cup of chopped pretzels (for a crunchy garnish)
Ingredients From : onesweetappetite.com
How to Make Halloween Mummy Cookies
Ready to dive into some spooky baking? Let’s get those Nutter Butter cookies transformed into mummies!
Step-by-Step Directions
Step 1: Prepare Your Workspace

Start by lining a baking sheet with parchment paper. This is where your mummy cookies will rest after you’ve dressed them up. Make sure your Nutter Butter cookies and candy eyes are within easy reach; you don’t want to be scrambling around when the chocolate starts to set!
Step 2: Melting the Chocolate

In a microwave-safe glass bowl, pour in your white candy melts. Heat them on a defrost setting for about one minute. Give them a good stir. If you see any lumps, continue heating in shorter 15-second intervals, stirring in between, until you achieve a smooth consistency. Avoid overheating, as this can cause the chocolate to seize.
Step 3: Dipping the Cookies

Once your candy melts are ready, it’s cookie-dipping time! One by one, dip a Nutter Butter cookie into the melted chocolate, ensuring it’s fully coated. Use a fork to lift the cookie out, letting any excess chocolate drip back into the bowl. Place the dipped cookie gently onto the parchment paper.
Step 4: Adding the Eyes

While the chocolate is still soft and warm, press two candy eyes onto the upper half of each cookie. This step is essential for giving your mummies their personality—don’t skip it!
Step 5: Creating the Mummy Wrappings

In a zip-top bag, place ½ cup of white candy melts and add 1 to 2 teaspoons of coconut oil; this will give your drizzle a beautiful sheen. Microwave the bag for approximately 30 seconds on defrost. Squeeze the bag to mix everything together. If needed, give it another short burst in the microwave.
Snip off a tiny corner of the bag and drizzle this melted mixture over the cookies in a back-and-forth motion, resembling the wrappings of a mummy.
Step 6: Let Them Set

Now, all that’s left is to allow your cookies to sit at room temperature until the chocolate hardens, which can take anywhere from 30 to 60 minutes depending on the environment.
Tips & Tricks
– Use a double boiler instead of a microwave for melting chocolate, if you prefer more control.
– Keep a steady hand when drizzling to create an even mummy wrap effect.
– If you want to add some flair, consider using colored sprinkles instead of candy eyes.
– Don’t fret about perfection; those uneven drizzles make mummies look even more Halloween-esque!
– Store leftover candy melts in an airtight container for future baking adventures.
Can I Store Halloween Mummy Cookies?
Absolutely! Store your Halloween Mummy Cookies in an airtight container at room temperature for up to a week. If it’s particularly warm or humid, you may want to refrigerate them to prevent the chocolate from melting or becoming too soft.
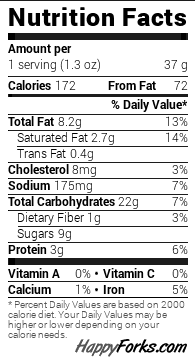
Nutrition Information
These Halloween Mummy Cookies are a sweet treat and, while they aren’t the healthiest option on the table, they’re certainly a fun addition to any Halloween festivities. Each cookie comes in at roughly 150 calories, mainly from the candy melts and cookies.
What Can I Serve with Halloween Mummy Cookies?
– Spooky Punch: An orange-flavored or “eyeball” punch will be a fun complement to your cookies.
– Caramel Popcorn: This sweet and salty combo is always a hit with kids and adults alike.
– Skeleton Veggie Platter: Balance the sweets with fresh veggies arranged to look like a skeleton!
– Candy Corn Trail Mix: A mixture of nuts, candies, and chocolate will be a delightful treat for guests.
– Ghostly Milkshakes: These creamy beverages will satisfy your sweet tooth while sticking to the theme!
What Other Substitutes Can I Use in Halloween Mummy Cookies?
– Peanut Butter Cookies: Swap Nutter Butter with any thick peanut butter cookie for an equally hearty cookie.
– Dark Chocolate: Use dark candy melts instead of white for a fun twist.
– Regular Chocolate Chips: If you don’t have melts, regular chocolate chips can work as well.
– Gummy Candies: Instead of candy eyes, use gummy candies cut in half to create a more playful look.
– Marshmallows: Small marshmallows can stand in for candy eyes for a fluffier look.
Halloween Mummy Cookies
Equipment
- Baking sheet
- Parchment paper
- microwave-safe bowl
- zip-top bag
Ingredients
- To whip up these delightful treats you’ll need the following ingredients:
- – 20 Nutter Butter cookies
- – 1 bag of white candy melts
- – 40 mini candy eyes or use round sprinkles
- – 1 tablespoon of coconut oil to add a smooth texture to your candy melts
- – 1 cup of chopped pretzels for a crunchy garnish
Instructions
Step 1: Prepare Your Workspace
- Start by lining a baking sheet with parchment paper. This is where your mummy cookies will rest after you’ve dressed them up. Make sure your Nutter Butter cookies and candy eyes are within easy reach; you don’t want to be scrambling around when the chocolate starts to set!
Step 2: Melting the Chocolate
- In a microwave-safe glass bowl, pour in your white candy melts. Heat them on a defrost setting for about one minute. Give them a good stir. If you see any lumps, continue heating in shorter 15-second intervals, stirring in between, until you achieve a smooth consistency. Avoid overheating, as this can cause the chocolate to seize.
Step 3: Dipping the Cookies
- Once your candy melts are ready, it’s cookie-dipping time! One by one, dip a Nutter Butter cookie into the melted chocolate, ensuring it’s fully coated. Use a fork to lift the cookie out, letting any excess chocolate drip back into the bowl. Place the dipped cookie gently onto the parchment paper.
Step 4: Adding the Eyes
- While the chocolate is still soft and warm, press two candy eyes onto the upper half of each cookie. This step is essential for giving your mummies their personality—don’t skip it!
Step 5: Creating the Mummy Wrappings
- In a zip-top bag, place ½ cup of white candy melts and add 1 to 2 teaspoons of coconut oil; this will give your drizzle a beautiful sheen. Microwave the bag for approximately 30 seconds on defrost. Squeeze the bag to mix everything together. If needed, give it another short burst in the microwave.
- Snip off a tiny corner of the bag and drizzle this melted mixture over the cookies in a back-and-forth motion, resembling the wrappings of a mummy.
Step 6: Let Them Set
- Now, all that’s left is to allow your cookies to sit at room temperature until the chocolate hardens, which can take anywhere from 30 to 60 minutes depending on the environment.
Notes
FAQs
1. Can I use different types of cookies?
Yes! While Nutter Butters work great, you can substitute with Oreo or another sturdy cookie.
2. How can I color the candy melts?
You can add food coloring to your melted candy melts before dipping for a different mummy look.
3. Are these cookies suitable for parties?
Definitely! They’re fun, festive, and can be made in larger batches.
4. Can I freeze the cookies?
Yes, you can freeze them! Just remember to separate layers with parchment paper to prevent sticking.
5. What’s the best way to clean up chocolate spills?
The easiest way is to work with warm water to soften chocolate before cleaning. Using paper towels to gently dab can also help.
Conclusion
Halloween Mummy Cookies make the perfect spooky treat to capture the Halloween spirit without a lot of fuss. They’re easy to make, fun to decorate, and provide a delightful sweet surprise for everyone. So gather your ingredients, call the kids in for a baking session, and enjoy creating some adorable treats that will become a celebrated tradition at your Halloween gatherings. Happy baking!