Sarah Brown
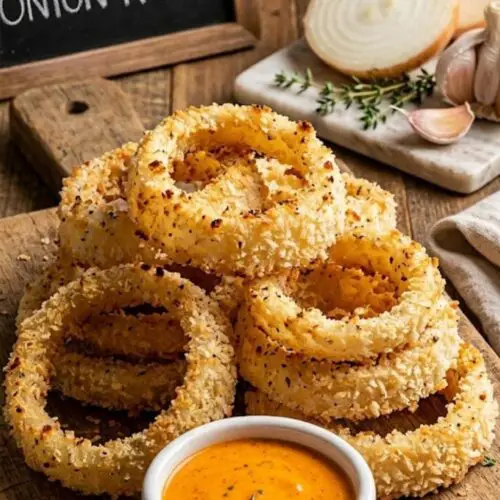
Onion rings have always held a special place in my heart and in my kitchen. Picture this: a sunny day, a grill fired up in the backyard, and a platter to share with friends. On the side, these crispy, baked onion rings glisten with a slightly golden hue, waiting to steal the show.
There’s something about that satisfying crunch paired with a tangy dipping sauce that just hits the spot. Whether alongside juicy burgers or a crisp salad, baked onion rings perfectly complement any gathering. It’s a great way to indulge without the guilt of frying, and trust me, your taste buds will thank you.

Let’s dive into the world of homemade baked onion rings. This lighter take on the classic favorite will still satisfy your cravings for something crunchy. They’re baked, not fried, which means you can enjoy the comforting flavors without all the extra oil.
With just the right amount of seasoning and a crunchy coating, these rings are a delightful addition to any meal or snack time.
You Might Like These Recipes!
Homemade Hot Pockets Pizza Dough Recipe
What are homemade onion rings baked?
Homemade baked onion rings are essentially slices of onion that are dipped in a light batter and then coated with crispy breadcrumbs before being baked in the oven. The result is a dish that has a tender inside and a crunchy outside, all while keeping it healthier than traditional fried onion rings. They make for an excellent snack, appetizer, or side dish, perfect for parties or family dinners.
How Does It Taste?
Imagine biting into a perfectly baked onion ring; the outside has a satisfying crunch, while the inside is tender and slightly sweet from the onion. With just a hint of cayenne and a touch of salt, each bite is a well-balanced symphony of flavors that is both savory and satisfying. It’s almost euphoric, providing that comfort food experience without overwhelming your palate or your waistline.
Why You’ll Love This?
This recipe for baked onion rings has so much to offer. They’re easy to make, use simple ingredients, and can be prepped ahead of time, making them an ideal choice for busy individuals or families. Plus, there’s something about making your own snacks that feels extra special! You don’t have to worry about any weird preservatives or additives; indulge yourself with ingredients you know and love. Whether you pair them with a dipping sauce or enjoy them plain, they’re sure to impress.
The Ingredients

– 1 large yellow onion, peeled and cut into 1/2-inch thick slices
– ½ cup all-purpose flour
– 3 cups panko breadcrumbs
– 2 large egg whites
– 2 tablespoons milk
– 1 pinch cayenne pepper (or to your heat preference)
– Salt and ground black pepper to taste
– Cooking spray
– ¼ teaspoon garlic powder (for extra flavor)
– ¼ teaspoon smoked paprika (adds a nice depth)
Feel free to mix and match these ingredients based on what you have at home, but these staples are a great place to start!
Ingredients From : allrecipes.com
How to Make Homemade Onion Rings Baked
Ready to take the plunge into onion ring heaven? Let’s get our hands a little messy as we coat these rings and toss them in the oven. Follow along for each easy step, and you’ll have a plateful of deliciousness in no time!
Step 1: Prepare the Oven and Baking Sheet

Preheat your oven to 450°F (230°C). While it heats, grab a large rimmed baking sheet and give it a light spray with cooking spray. This ensures that your onion rings won’t stick and helps achieve a crispier finish.
Step 2: Whisk the Egg Mixture

In a medium mixing bowl, whisk together the egg whites, milk, and cayenne pepper. Make sure everything is blended well. This mixture will help the breadcrumbs stick to those onion rings beautifully, so take a moment to do it right.
Step 3: Set Up the Panko Coating Station

In a separate bowl, place the panko breadcrumbs, adding a sprinkle of salt, pepper, garlic powder, and smoked paprika. Mix well, so the flavors are evenly dispersed. This is where the magic happens!
Step 4: Coat the Onion Slices

Using tongs, dip one onion slice into the egg mixture, ensuring it’s fully coated. Allow any excess liquid to drip back into the bowl. Then, gently place the wet onion into the bowl of panko and shake until it’s well covered. Don’t rush through this; the more even the coating, the better the crispiness will be!
Step 5: Arrange on the Baking Sheet

After coating each onion ring, place it on the prepared baking sheet. Ensure they’re spread out with enough space in between them to encourage even baking. Repeat this process with the remaining onion slices.
Step 6: Spray and Bake

Once all your onion rings are coated and arranged, give them a light spray of cooking spray one more time. This will help those breadcrumbs turn golden brown and crunchy. Now pop them into the preheated oven and bake for 12 to 15 minutes, or until they look crispy and golden. Keep an eye on them; you want that perfect crunch!
Tips On Making Homemade Onion Rings Baked
– Experiment with Flavors: Add different herbs and spices to the panko for a personalized touch. Dried basil or oregano can give an Italian twist!
– Cut Thickness Matters: For the best texture, slice your onions evenly. Aim for about ½ inch thick so they cook perfectly; too thin will turn to mush!
– Don’t Rush the Coating: Ensure each onion slice is evenly coated with the egg and breadcrumbs. This will help achieve that delightful crunch.
– Try Different Onions: While yellow onions are classic, you can experiment with sweet Vidalia or even red onions for a milder flavor.
– Double the Batch: These baked onion rings are great for leftovers; double the recipe to ensure you’ll have enough to share (or snack on later!).
Storage Tips
If you have any leftovers, let them cool completely first, then transfer them to an airtight container. Store them in the refrigerator for up to three days. When you’re ready to eat them again, you can reheat them in the oven at 375°F for about 5-10 minutes to regain that nice crunch.
Serving Suggestions
– With your favorite dipping sauce: Ketchup, ranch, or a zesty chipotle mayo take these onion rings to the next level.
– As a side dish for burgers: Pair them perfectly with any grilled sandwich or burger for a delicious meal.
– Topped on salads: Crumble on top of a fresh salad for added crunch and flavor.
– As a party appetizer: Serve these at your next gathering; they’re a guaranteed hit!
– Next to tacos: Use them as a side to your favorite taco recipe for a fun flavor combination.
What Other Substitutes Can I Use in Homemade Onion Rings Baked?
– Sweet Potatoes: Slice them like onion rings for a sweet twist, simply follow the same coating process.
– Zucchini: Use zucchini slices or sticks as a low-carb alternative.
– Cauliflower: Slice cauliflower into thick pieces for a veggie-packed option.
– Different Breadcrumbs: Try using gluten-free breadcrumbs if you want to make this dish gluten-free.
– Onion Powder: For an oniony kick, add a sprinkle of onion powder to the panko mixture!
Homemade Baked Onion Rings
Equipment
- Baking sheet
- mixing bowls
- tongs
- Whisk
Ingredients
- – 1 large yellow onion peeled and cut into 1/2-inch thick slices
- – ½ cup all-purpose flour
- – 3 cups panko breadcrumbs
- – 2 large egg whites
- – 2 tablespoons milk
- – 1 pinch cayenne pepper or to your heat preference
- – Salt and ground black pepper to taste
- – Cooking spray
- – ¼ teaspoon garlic powder for extra flavor
- – ¼ teaspoon smoked paprika adds a nice depth
- Feel free to mix and match these ingredients based on what you have at home but these staples are a great place to start!
Instructions
Step 1: Prepare the Oven and Baking Sheet
- Preheat your oven to 450°F (230°C). While it heats, grab a large rimmed baking sheet and give it a light spray with cooking spray. This ensures that your onion rings won’t stick and helps achieve a crispier finish.
Step 2: Whisk the Egg Mixture
- In a medium mixing bowl, whisk together the egg whites, milk, and cayenne pepper. Make sure everything is blended well. This mixture will help the breadcrumbs stick to those onion rings beautifully, so take a moment to do it right.
Step 3: Set Up the Panko Coating Station
- In a separate bowl, place the panko breadcrumbs, adding a sprinkle of salt, pepper, garlic powder, and smoked paprika. Mix well, so the flavors are evenly dispersed. This is where the magic happens!
Step 4: Coat the Onion Slices
- Using tongs, dip one onion slice into the egg mixture, ensuring it’s fully coated. Allow any excess liquid to drip back into the bowl. Then, gently place the wet onion into the bowl of panko and shake until it’s well covered. Don’t rush through this; the more even the coating, the better the crispiness will be!
Step 5: Arrange on the Baking Sheet
- After coating each onion ring, place it on the prepared baking sheet. Ensure they’re spread out with enough space in between them to encourage even baking. Repeat this process with the remaining onion slices.
Step 6: Spray and Bake
- Once all your onion rings are coated and arranged, give them a light spray of cooking spray one more time. This will help those breadcrumbs turn golden brown and crunchy. Now pop them into the preheated oven and bake for 12 to 15 minutes, or until they look crispy and golden. Keep an eye on them; you want that perfect crunch!
Notes
Nutrition
FAQs
1. Can I use whole eggs instead of egg whites?
Absolutely! Whole eggs can work just fine. However, using just the egg whites helps cut down on calories and fat, which is why I prefer them.
2. Can I make these vegan?
Yes! Swap out the egg whites for a flaxseed meal mixed with water or a store-bought egg substitute, and use non-dairy milk as well.
3. Can I freeze baked onion rings?
Yes! You can freeze them before or after baking. Just ensure they are well-wrapped and stored in an airtight container. Reheat in the oven when ready to serve.
4. What dipping sauce goes well with baked onion rings?
Ketchup is the classic choice, but you might also enjoy ranch, BBQ sauce, or a spicy sriracha mayo for something different.
5. How do I ensure the onion rings are extra crispy?
Allow enough space between each ring on the pan and give them a quick spray of cooking oil before baking. This will boost that crispy texture!
Conclusion
Baked onion rings are more than just a side snack; they’re a crunchy celebration that you can whip up in no time. With minimal ingredients and basic steps, you can create a delightful treat that’s healthier than the traditional fried version.
Whether they accompany a hearty burger, serve as a fun appetizer, or add a tasty crunch to a salad, these baked onion rings are sure to become a new favorite in your home. So, grab those onions and let’s get baking!