Sarah Brown
The arrival of warmer weather always brings a certain joy, doesn’t it? It feels like the entire world is suddenly awash in color and flavor. When I think about hot summer days, my mind drifts off to gatherings in the backyard, long days at the beach, or just lounging in a lawn chair, soaking up the sun.

And what could be better on those scorching afternoons than a homemade popsicle? Pair these fruity delights with fresh fruit salad or savory grilled veggies, and you’ve created the perfect warm-weather feast.
Let’s talk about popsicles—those frozen treats that never fail to bring a smile. They remind me of childhood summers, running barefoot on the grass, sticky fingers, and often, a shivering bite of icy goodness in the heat.
Today, I want to share an easy, fun recipe for homemade popsicles using Jell-O. They’re refreshingly sweet, beautifully colorful, and free from all those questionable ingredients found in store-bought ones. Plus, you can customize them to match your mood or the occasion. Ready to dive in?
You Might Like These Recipes!
Homemade Ice Cream Wendy’s Frosty Recipe
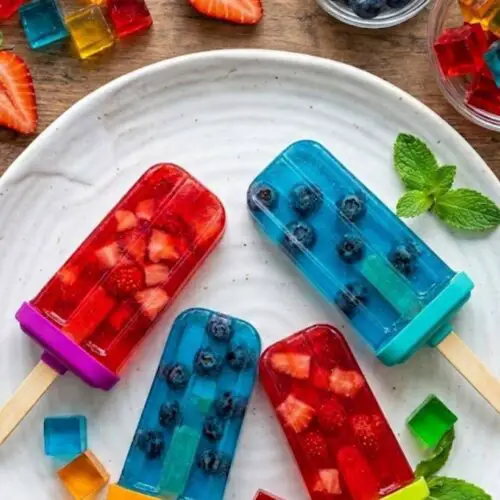
What is Homemade Popsicles with Jello?
Homemade popsicles with Jell-O are a nostalgic summertime treat made by dissolving flavored gelatin in water and freezing it into popsicle molds. You can create various flavors and combinations to suit your taste buds, making these popsicles not only refreshing but also incredibly fun. They’re easy to make at home, and the best part? You know exactly what’s going into them.
Why This Recipe Works?
This recipe works for several reasons. For one, Jell-O gives vibrant colors and flavors that appeal to both kids and adults alike. The combination of boiling and cold water provides the perfect texture to ensure that these popsicles are flavorful and freeze beautifully. Plus, they’re a fantastic canvas for creativity—add fruit pieces, swap flavors, or even mix in some yogurt for a creamy twist. Overall, this recipe is a delightful way to cool off in the summer heat.
Ingredients You’ll Need to Make Homemade Popsicles with Jello:

– ▢ 1 package Jell-O (3 oz. flavor of your choice)
– ▢ ½ cup sugar (to balance with the sweetness of the Jell-O)
– ▢ 2 cups water (1 cup for boiling, 1 cup cold)
– ▢ ½ cup fresh juice (like orange or pineapple) for added flavor
– ▢ Optional: sliced fresh fruit (strawberries, kiwi, or berries) for extra texture and fun
Ingredients From : eatingonadime.com
How to Make Homemade Popsicles with Jello?
Creating your own popsicles is as simple as pie and so much fun! Get ready to stir, mix, and freeze your way to icy bliss. Follow these steps to whip up a batch of delicious, fruity popsicles that will keep you cool all summer long.
Step 1: Boil the Water

In a medium saucepan, bring 1 cup of water to a rolling boil. This heating step is essential for dissolving the ingredients properly and setting the stage for a vibrant, flavorful popsicle.
Step 2: Mix in Jell-O and Sugar

Once the water is boiling, carefully add the Jell-O mix and the sugar. Give it a good stir to ensure everything combines smoothly. You want the gelatin and sugar to dissolve completely without any graininess. This is where you start to see that lovely color emerge!
Step 3: Add Cold Water and Juice

Next, remove the saucepan from heat and carefully stir in 1 cup of cold water and the fresh juice. This step not only helps cool down the mixture but adds a new layer of flavor that elevates your popsicles beyond the average treat. Taste the mix—if you want it sweeter, feel free to adjust with a little more sugar.
Step 4: Prepare the Molds

If adding sliced fruit, now is the time! Place your chosen fruits in the popsicle molds. This adds visual appeal and an exciting texture. Pour the Jell-O mixture over the fruit in the molds, filling them about three-quarters full to allow for expansion.
Step 5: Freeze

Pop the molds in your freezer and let them chill for at least four hours. For the best results, I recommend leaving them overnight so they freeze completely. You’ll be eagerly waiting to dig in!
Step 6: Unmold and Enjoy!

Once fully frozen, remove the molds from the freezer. To release your popsicles, run warm water over the outside of the molds for about 10 seconds. Gently pull on the sticks, and voila! You’ve got a colorful, tasty treat ready for enjoyment.
Tips:
– Use silicone molds for easier removal. They’re flexible and make the pops pop right out!
– Experiment with different fruit juice combinations—mango and peach, for example, can be deliciously tropical.
– If you want a creamier popsicle, add a dollop of yogurt before freezing.
– For a little extra fun, layer different flavors in the molds for a striped effect.
– If you have leftover mixture, pour it into a cup and enjoy a delicious frozen treat while the popsicles freeze!
How to Store The Leftovers?
If you happen to have any leftover popsicles (which is highly unlikely), simply leave them in their molds, or pop them out and place them in an airtight container. Wrap them well to prevent freezer burn. Properly stored, they can last up to a month in the freezer. Enjoy them straight from the freezer whenever the craving hits!
What are Some Recommended Side Dishes for Homemade Popsicles with Jello?
1. Fresh Fruit Salad: A mix of seasonal fruits like berries, melon, and citrus pairs perfectly with your sweet pops.
2. Cheese Platter: Serve some cheese and crackers for a savory contrast. Goat cheese adds a tangy bite!
3. Veggie Sticks with Hummus: Crunchy veggies like carrots, cucumbers, and bell peppers with a creamy dip make for a refreshing side.
4. Grilled Chicken Skewers: The heartiness of grilled meat complements the sweet, fruity flavors of the popsicles.
5. Simple Green Salad: A vibrant mix of greens tossed with a light vinaigrette can balance out the sweetness of the popsicles beautifully.
If the Items Are Not Available in Your Pantry, What are Some Substitute Options for the Ingredients?
1. Jell-O: Try using a store-bought gelatin without artificial ingredients or, for a natural option, you can use fruit purees or juice that has been thickened.
2. Sugar: If you’re looking for a healthier substitute, opt for honey or agave syrup, adjusting the amount to taste.
3. Water: Coconut water can replace regular water for a tropical twist that adds flavor and hydration.
4. Fresh Juice: If you don’t have juice, use soda, lemonade, or flavored sparkling water for a fizzy kick.
5. Fruit: Almost any fruit can replace those in your recipe. Think berries, peaches, or even canned fruit in juice.
Homemade Popsicles With Jello
Equipment
- Popsicle molds
- Mixing bowl
- Saucepan
Ingredients
- – ▢ 1 package Jell-O 3 oz. flavor of your choice
- – ▢ ½ cup sugar to balance with the sweetness of the Jell-O
- – ▢ 2 cups water 1 cup for boiling, 1 cup cold
- – ▢ ½ cup fresh juice like orange or pineapple for added flavor
- – ▢ Optional: sliced fresh fruit strawberries, kiwi, or berries for extra texture and fun
Instructions
Step 1: Boil the Water
- In a medium saucepan, bring 1 cup of water to a rolling boil. This heating step is essential for dissolving the ingredients properly and setting the stage for a vibrant, flavorful popsicle.
Step 2: Mix in Jell-O and Sugar
- Once the water is boiling, carefully add the Jell-O mix and the sugar. Give it a good stir to ensure everything combines smoothly. You want the gelatin and sugar to dissolve completely without any graininess. This is where you start to see that lovely color emerge!
Step 3: Add Cold Water and Juice
- Next, remove the saucepan from heat and carefully stir in 1 cup of cold water and the fresh juice. This step not only helps cool down the mixture but adds a new layer of flavor that elevates your popsicles beyond the average treat. Taste the mix—if you want it sweeter, feel free to adjust with a little more sugar.
Step 4: Prepare the Molds
- If adding sliced fruit, now is the time! Place your chosen fruits in the popsicle molds. This adds visual appeal and an exciting texture. Pour the Jell-O mixture over the fruit in the molds, filling them about three-quarters full to allow for expansion.
Step 5: Freeze
- Pop the molds in your freezer and let them chill for at least four hours. For the best results, I recommend leaving them overnight so they freeze completely. You’ll be eagerly waiting to dig in!
Step 6: Unmold and Enjoy!
- Once fully frozen, remove the molds from the freezer. To release your popsicles, run warm water over the outside of the molds for about 10 seconds. Gently pull on the sticks, and voila! You’ve got a colorful, tasty treat ready for enjoyment.
Notes
Nutrition
FAQs:
1. Can I make these popsicles vegan?
Yes! As long as you use plant-based juices and ensure that the Jell-O you choose is vegan, you’re on the right path. Be sure to check the gelatin source—opt for vegan alternatives.
2. How long do these popsicles last?
When stored properly, they can last about a month in the freezer. However, they are best enjoyed within a couple of weeks for optimal flavor and texture.
3. Can I use sugar substitutes?
Absolutely! Feel free to use sugar substitutes like stevia or erythritol. Just be mindful of sweetness levels, as some zero-calorie sweeteners can be much stronger than sugar.
4. Is it possible to make these popsicles without molds?
Yes! You can use small cups and sticks instead. Just pour the mixture in, freeze for an hour, insert a stick, and then freeze until solid.
5. What happens if I leave them in the freezer too long?
While they can go a bit icy or lose some taste after extended freezing, they should still be safe to eat. The texture might change, so it’s best to enjoy them fresh!
Conclusion:
Homemade popsicles with Jell-O are a fun, simple way to cool down during those long summer days. The vibrant colors and refreshing flavors make them a favorite for kids and adults alike. Plus, with easy-to-find ingredients and an adaptable recipe, you’ll find endless ways to personalize these treats.
So grab your molds, unleash your creativity, and embrace the joy of homemade popsicles—summer just wouldn’t be the same without them! Enjoy!