Sarah Brown
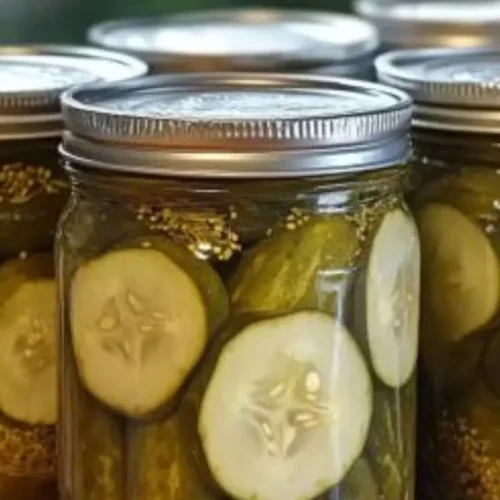
There’s something extraordinary about the crunch of a homemade dill pickle. Perfectly balanced with tangy vinegar, aromatic spices, and fresh cucumbers—these pickles are the delightful sidekick to many dishes. Personally, I love pairing them with a hearty sandwich, hot off the grill. They add that touch of zest that takes a regular lunch to new heights.

If you’re anything like me, you’ve often found yourself reminiscing about the good old-fashioned flavors that only grandma could achieve. This old-fashioned canned dill pickle recipe will take you down memory lane while filling your pantry with a timeless treat. Let’s dive in; I’ll guide you through everything you need to know.
You will also like the following Side Dish recipes!
- Best Simple tuna macaroni salad
- Copycat sweet sun tea with lipton tea bags
- How to make Tuna and rice casserole with mushroom soup
What is the Old Fashioned Canned Dill Pickle?
In essence, an old-fashioned canned dill pickle recipe is a method passed down through generations that captures the essence of fresh cucumbers preserved in a vinegar-brine solution. With a harmonious blend of dill, garlic, mustard seeds, and other spices, it creates pickles that have stood the test of time.
The Ingredients
Here is a list of what you’ll need:
- 5 cups water
- 1/2 cup white vinegar
- 1/3 cup salt
- 1 large onion slice per quart jar
- 1 clove garlic per quart jar
- 8 cups cucumber spears or slices
- 4 bunches of fresh dill with stems or 4 teaspoons of dried dill weed per quart jar
- 1 teaspoon mustard seeds per quart jar
- 1 teaspoon ground horseradish (optional) per quart jar
- 1 teaspoon coriander seeds per quart jar
- 1 teaspoon crushed red pepper flakes per quart jar

How to Make the Old Fashioned Canned Dill Pickle?
Creating these pickles is both an art and a science. You’ll need to carefully measure ingredients, follow specific steps, and have a bit of patience. Here’s an overview before we get into the nitty-gritty.
Step by Step Directions
Step 1: Prepare the Brine
First, let’s make the brine. In a large pot, combine 5 cups of water, 1/2 cup of white vinegar, and 1/3 cup of salt. Bring the mixture to a boil, then reduce heat and simmer for 10 minutes. This is where the magic starts!
Step 2: Sterilize the Jars
While the brine is cooking, sterilize your jars. Place them in a large pot of boiling water for at least 10 minutes. It’s super important to ensure everything is squeaky clean to keep your pickles safe from unwanted bacteria.
Step 3: Prepare the Spices and Vegetables
Slice your cucumbers into spears or rounds. Prepare the dill, garlic, and other spices. For each quart jar, use 1 large onion slice, 1 clove of garlic, and the specific amounts of mustard seeds, dill, ground horseradish (if using), coriander seeds, and red pepper flakes.
Step 4: Pack the Jars
Now it’s time to pack the jars. Place the spices and dill at the bottom of the jar. Firmly pack the cucumber slices or spears into the jars. The tighter you pack, the better. Leave about 1/2 inch of headspace at the top of each jar.
Step 5: Add the Brine
Carefully pour the hot brine into each jar, ensuring the cucumbers are fully submerged. Leave the 1/2 inch headspace at the top. Wipe the rims of the jars with a clean, damp cloth.
Step 6: Seal the Jars
Place the lids on the jars and firmly screw on the bands. A snug fit is perfect, but don’t overtighten.
Step 7: Process the Jars
Finally, place the sealed jars back into the pot of boiling water, ensuring they are fully submerged. Process for 10-15 minutes. Remove and let them cool on a towel for 24 hours. You should hear the sweet ‘ping’ of sealing jars as they cool.
Notes
- Choose fresh cucumbers: For the best crunch, use firm, fresh cucumbers.
- Don’t skip the sterilization: Ensuring jars and lids are sterilized prevents bacterial growth.
- Adjust spice levels: Feel free to tweak the spices to suit your taste preferences.
- Store in a cool, dark place: Proper storage enhances flavor over time.
- Wait before eating: Allow your pickles to sit for at least a week to develop full flavor.
Storage Tips
Store your canned pickles in a cool, dark pantry. Once opened, keep them refrigerated. Properly canned, they can last up to a year unopened. Once opened, consume within a few months.

Nutrition Information (Per Serving: Approximately 1 spear)

Serving Suggestions
Burgers: These pickles add the perfect crunch and zest to any burger.
Sandwiches: A classic pairing; try them with a pastrami or turkey sandwich.
Salads: Chop them up and add to potato salad or a mixed green salad.
Charcuterie boards: They complement cheeses, cured meats, and fresh vegetables.
Snacking: Simply enjoy them right out of the jar for a guilt-free snack.
What Other Substitutes Can I Use in This Old Fashioned Canned Dill Pickle?
Apple Cider Vinegar: For a slightly sweeter, milder flavor, use apple cider vinegar instead of white vinegar.
Sugar: Add a tablespoon of sugar per jar for a hint of sweetness.
Fresh Hot Peppers: For added heat, include a slice or two of jalapeño or habanero.
Different Herbs: Experiment with fresh basil, thyme, or tarragon in addition to or instead of dill.
Pickling Spice Mixes: You can find pre-made pickling spice mixes that add unique and complex flavors.
Old fashioned canned dill pickle recipe
Equipment
- Large pot
- Jars
Ingredients
- 5 cups water
- 1/2 cup white vinegar
- 1/3 cup salt
- 1 large onion slice per quart
- 1 clove garlic per quart
- 8 cups cucumber spears or slices
- 4 bunches of fresh dill with stems or 4 teaspoons of dried dill weed per quart
- 1 teaspoon mustard seeds per quart
- 1 teaspoon ground horseradish optional; I prefer to leave this out per quart
- 1 teaspoon coriander seeds per quart
- 1 teaspoon crushed red pepper flakes per quart
Instructions
Step 1: Prepare the Brine
- First, let’s make the brine. In a large pot, combine 5 cups of water, 1/2 cup of white vinegar, and 1/3 cup of salt. Bring the mixture to a boil, then reduce heat and simmer for 10 minutes. This is where the magic starts!
Step 2: Sterilize the Jars
- While the brine is cooking, sterilize your jars. Place them in a large pot of boiling water for at least 10 minutes. It’s super important to ensure everything is squeaky clean to keep your pickles safe from unwanted bacteria.
Step 3: Prepare the Spices and Vegetables
- Slice your cucumbers into spears or rounds. Prepare the dill, garlic, and other spices. For each quart jar, use 1 large onion slice, 1 clove of garlic, and the specific amounts of mustard seeds, dill, ground horseradish (if using), coriander seeds, and red pepper flakes.
Step 4: Pack the Jars
- Now it’s time to pack the jars. Place the spices and dill at the bottom of the jar. Firmly pack the cucumber slices or spears into the jars. The tighter you pack, the better. Leave about 1/2 inch of headspace at the top of each jar.
Step 5: Add the Brine
- Carefully pour the hot brine into each jar, ensuring the cucumbers are fully submerged. Leave the 1/2 inch headspace at the top. Wipe the rims of the jars with a clean, damp cloth.
Step 6: Seal the Jars
- Place the lids on the jars and firmly screw on the bands. A snug fit is perfect, but don’t overtighten.
Step 7: Process the Jars
- Finally, place the sealed jars back into the pot of boiling water, ensuring they are fully submerged. Process for 10-15 minutes. Remove and let them cool on a towel for 24 hours. You should hear the sweet ‘ping’ of sealing jars as they cool.
Notes
- Choose fresh cucumbers: For the best crunch, use firm, fresh cucumbers.
- Don’t skip the sterilization: Ensuring jars and lids are sterilized prevents bacterial growth.
- Adjust spice levels: Feel free to tweak the spices to suit your taste preferences.
- Store in a cool, dark place: Proper storage enhances flavor over time.
- Wait before eating: Allow your pickles to sit for at least a week to develop full flavor.
Nutrition
Frequently Asked Questions
1. Can I use other vegetables instead of cucumbers?
Yes, this recipe works great with carrots, green beans, or even cauliflower.
2. How do I know if my jars are properly sealed?
Check for a depressed lid. When you press the center, it shouldn’t move. If it pops up and down, the jar isn’t sealed.
3. Is it necessary to wait a week before eating pickles?
Yes, giving them time allows the flavors to meld together, producing a more intense taste.
4. What can I do if my pickles turn out too salty?
You can soak over-salted pickles in cold water for about 30 minutes before eating. This helps leach out some of the salt.
5. Why did my pickles turn out mushy?
Mushy pickles can result from using overripe cucumbers or not processing the jars correctly. Stick to younger, smaller cucumbers for crunchier results.
Conclusion
Homemade canned dill pickles are an adventurous project that pays off wonderfully. Packed with character, they are versatile and loved by many. Plus, creating them yourself is satisfying and ensures you know exactly what goes into your food. Happy pickling!