Have you ever wanted to transport yourself to a cozy kitchen in Russia, where the aroma of freshly baked piroshki fills the air? Piroshki, those delightful pastries filled with various fillings, can do just that.
They are perfect for any gathering, offering comfort and warmth in every bite. But first, let’s talk about what pairs wonderfully with these treats: tangy pickles, a dollop of sour cream, or even a side of beet salad can elevate your meal. Now, let’s dive into our main event—the beef and cabbage piroshki recipe.
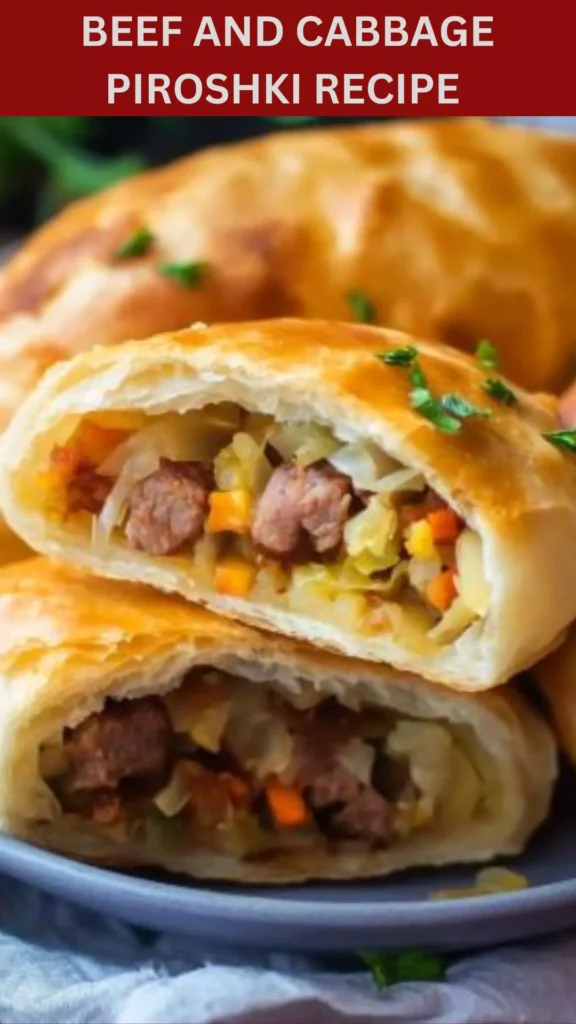
When I first came across piroshki, I was captivated by their charm. These baked or fried pastries can be stuffed with almost anything. However, beef and cabbage have always been my favorite combination.
There’s something satisfying about the savory meat paired with tender cabbage wrapped in a flaky crust. Today, I want to share my go-to recipe along with tips, variations, and a bit of history. It’s time to roll up your sleeves and get cooking!
You will also like the following Delicious recipes!
Why This Recipe Works
1. Balanced Flavors
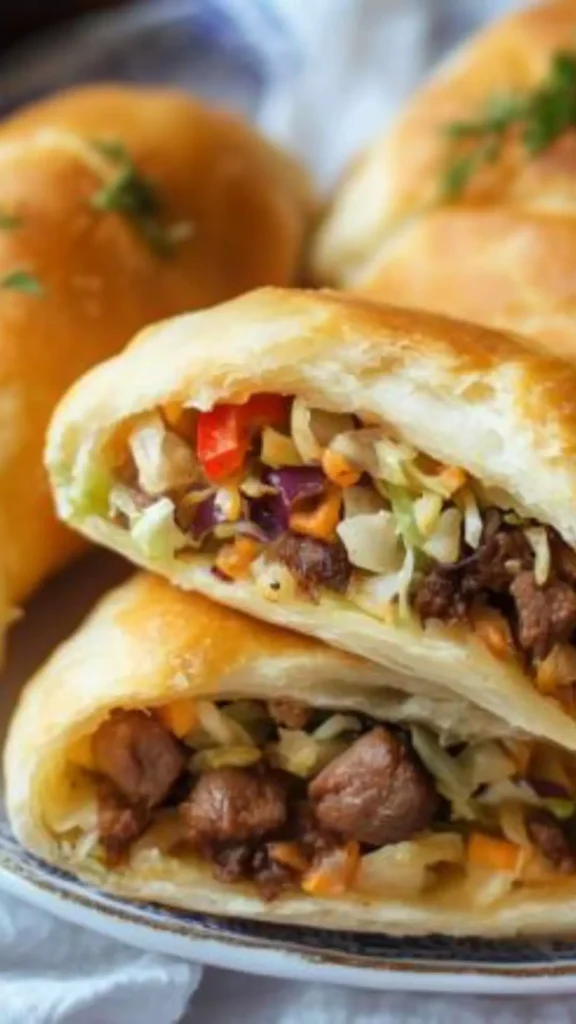
The combination of beef, cabbage, and seasoning creates a hearty filling. The richness of ground beef contrasts beautifully with the mild flavor of cabbage, offering an utterly satisfying experience.
2. Easy Assembly
Using pre-made pie crust makes this recipe accessible even for those who feel intimidated in the kitchen. You can whip up a batch quickly and still impress your family and friends with your homemade touch.
3. Crowd-Pleaser
These little pastries can easily turn into your next party hit. They’re convenient finger foods, ideal for any gathering—be it game night, a picnic, or a simple family dinner.
4. Make-Ahead Friendly
You can prepare the filling ahead of time and freeze it. When unexpected guests arrive, all you need to do is assemble and bake. It’s like having a secret weapon in your culinary arsenal!
How Does It Taste Like?
Imagine biting into a golden, flaky crust and tasting the buttery flavor accompanied by a savory and warm filling. The beef is rich, while the cabbage contributes a subtle sweetness. Each bite reveals layers of flavor, thanks to the seasoning that brings everything together. You’ll enjoy a comforting, satisfying meal that feels like a hearty hug.
What Sets This Recipe Apart?
Many beef and cabbage piroshki recipes rely heavily on heavy seasoning or unusual ingredients. This recipe keeps it simple and authentic. It focuses on the natural flavors of the ingredients. Additionally, using pre-made pie crust makes it accessible, while still allowing room for customization.
The Ingredients
Gathering the right ingredients is key. Here’s what you need:
- 1 beaten egg
- 1/4 cup unsalted butter (or margarine)
- 1/2 lb ground beef
- 1/2 cup shredded processed American cheese (approximately 2 oz.)
- 1 tablespoon Dijon mustard
- 1 teaspoon sea salt
- 1 teaspoon Worcestershire sauce
- 1/2 teaspoon freshly ground black pepper
- 1 1/2 cups coarsely shredded cabbage
- 1/3 cup finely diced onion
- 1 package of pre-made pie crust sticks or 1 package of pie crust mix
- 1 teaspoon water
- Chili sauce, to taste
- 1/2 teaspoon garlic powder
- 1/4 teaspoon paprika
Instructions
Let’s dive into the step-by-step process of making these delightful piroshki!
Step 1: Preheat the Oven
Preheat your oven to 375°F (190°C). A hot oven ensures our piroshki bake evenly, yielding that perfect golden crust.
Step 2: Prepare the Filling
- In a skillet over medium heat, melt the unsalted butter. Add the diced onions and cook until translucent, about 3-4 minutes.
- Next, add the ground beef. Brown it until fully cooked, breaking it apart as it cooks. Drain any excess fat.
- Add the shredded cabbage, sea salt, black pepper, garlic powder, and paprika. Stir well, letting the cabbage soften, which will take about 5-7 minutes.
- Once done, remove the skillet from heat. Stir in the Worcestershire sauce, Dijon mustard, and shredded cheese until melted and well combined. Allow this filling to cool slightly.
Step 3: Roll Out the Dough
- If you’re using pie crust sticks, roll them out onto a lightly floured surface. If you opted for a pie crust mix, follow the package instructions to prepare your dough.
- Roll out the dough to about 1/8-inch thickness. Use a round cutter (about 4 inches in diameter) to cut out circles.
Step 4: Fill and Seal
- Place a tablespoon of your beef and cabbage filling in the center of each circle.
- Brush the edges with the beaten egg to help seal the piroshki.
- Fold the dough over, creating a half-moon shape. Press the edges with a fork for a decorative finish and to ensure they are sealed properly.
Step 5: Bake
- Place the piroshki on a lined baking sheet. Brush the tops with the remaining beaten egg for a nice glaze.
- Bake for 25-30 minutes or until golden brown.
Step 6: Serve
Allow them to cool slightly before serving. You can accompany them with chili sauce for dipping or a dollop of sour cream.
Notes
Here are a few tips to enhance your piroshki experience:
- Freeze Unbaked Piroshki: You can prepare the piroshki and freeze them before baking. Bake from frozen, adding a few extra minutes to the baking time.
- Mix the Meat: Try mixing beef with other proteins like pork or turkey for different flavors.
- Customize the Filling: Feel free to add spices or herbs like dill or parsley for added depth.
- Monitor Baking Time: Oven temperatures can vary. Keep an eye on them to avoid burning.
- Experiment with Shapes: Get creative with the shape of your piroshki. They don’t have to be half-moons!

Nutrition Information
How Do You Store This Beef and Cabbage Piroshki?
Storing piroshki properly can give you leftovers to enjoy later. Here’s how:
- Refrigerate: Place cooled piroshki in an airtight container in the fridge. They’ll stay fresh for about 3-4 days.
- Freeze: If you can’t finish them, freeze baked piroshki. Wrap each one in plastic wrap, then place them in a freezer-safe bag. They’ll last for about 2 months. To reheat, bake them from frozen at 375°F for about 15-20 minutes.
Sides for Beef and Cabbage Piroshki
What can you serve alongside these piroshki? Here are three great options:
1. Beet Salad
A traditional Russian beet salad, known as vinaigrette, complements the hearty nature of piroshki. With ingredients like beets, carrots, and pickles, it provides a refreshing, tangy balance to the rich flavors.
2. Pickles
Serve pickles for crunch and acidity. Their sharpness cuts through the richness of the piroshki, making each bite more delightful.
3. Sour Cream Dip
A simple sour cream blend with fresh herbs can provide a creamy topping that enhances the flavors of the filling. Add a sprinkle of dill or chives for an aromatic touch.
What Alternatives Can You Use for the Ingredients?
No cabbage or ground beef on hand? No problem! Here are some alternatives:
1. Ground Turkey or Chicken
These lean meats are excellent substitutes for ground beef. They will provide a lighter filling, perfect for a healthier option.
2. Leafy Greens
If cabbage is unavailable, use spinach or kale. They will impart different flavors while maintaining the essence of the filling.
3. Mixed Veggies
Add a variety of mixed vegetables in place of cabbage to make it vegetarian-friendly. Options like mushrooms, carrots, or bell peppers work well.
4. Cheese Variations
Instead of American cheese, try cheddar, mozzarella, or even feta for a different taste experience. Each cheese adds its unique flavor to the filling.

Beef And Cabbage Piroshki Recipe
Equipment
- Skillet
- Lined baking sheet
- Round cutter
- Fork
Ingredients
- 1 beaten egg
- 1/4 cup unsalted butter or margarine
- 1/2 lb ground beef
- 1/2 cup shredded processed American cheese approximately 2 oz.
- 1 tablespoon Dijon mustard
- 1 teaspoon sea salt
- 1 teaspoon Worcestershire sauce
- 1/2 teaspoon freshly ground black pepper
- 1 1/2 cups coarsely shredded cabbage
- 1/3 cup finely diced onion
- 1 package of pre-made pie crust sticks or 1 package of pie crust mix
- 1 teaspoon water
- Chili sauce to taste
- 1/2 teaspoon garlic powder
- 1/4 teaspoon paprika
Instructions
- Let’s dive into the step-by-step process of making these delightful piroshki!
Step 1: Preheat the Oven
- Preheat your oven to 375°F (190°C). A hot oven ensures our piroshki bake evenly, yielding that perfect golden crust.
Step 2: Prepare the Filling
- In a skillet over medium heat, melt the unsalted butter. Add the diced onions and cook until translucent, about 3-4 minutes.
- Next, add the ground beef. Brown it until fully cooked, breaking it apart as it cooks. Drain any excess fat.
- Add the shredded cabbage, sea salt, black pepper, garlic powder, and paprika. Stir well, letting the cabbage soften, which will take about 5-7 minutes.
- Once done, remove the skillet from heat. Stir in the Worcestershire sauce, Dijon mustard, and shredded cheese until melted and well combined. Allow this filling to cool slightly.
Step 3: Roll Out the Dough
- If you’re using pie crust sticks, roll them out onto a lightly floured surface. If you opted for a pie crust mix, follow the package instructions to prepare your dough.
- Roll out the dough to about 1/8-inch thickness. Use a round cutter (about 4 inches in diameter) to cut out circles.
Step 4: Fill and Seal
- Place a tablespoon of your beef and cabbage filling in the center of each circle.
- Brush the edges with the beaten egg to help seal the piroshki.
- Fold the dough over, creating a half-moon shape. Press the edges with a fork for a decorative finish and to ensure they are sealed properly.
Step 5: Bake
- Place the piroshki on a lined baking sheet. Brush the tops with the remaining beaten egg for a nice glaze.
- Bake for 25-30 minutes or until golden brown.
Step 6: Serve
- Allow them to cool slightly before serving. You can accompany them with chili sauce for dipping or a dollop of sour cream.
Notes
- Freeze Unbaked Piroshki: You can prepare the piroshki and freeze them before baking. Bake from frozen, adding a few extra minutes to the baking time.
- Mix the Meat: Try mixing beef with other proteins like pork or turkey for different flavors.
- Customize the Filling: Feel free to add spices or herbs like dill or parsley for added depth.
- Monitor Baking Time: Oven temperatures can vary. Keep an eye on them to avoid burning.
- Experiment with Shapes: Get creative with the shape of your piroshki. They don’t have to be half-moons!
Nutrition
Frequently Asked Questions
1. Can I make piroshki ahead of time?
Yes! You can prepare the filling and even shape the piroshki in advance. Freeze them prior to baking, and when you’re ready, just pop them in the oven.
2. Are piroshki gluten-free?
You can make gluten-free piroshki by using gluten-free pie crust. Just ensure all other ingredients, especially the filling seasonings, are also gluten-free.
3. Can I fry these instead of baking?
Absolutely! You can pan-fry them in oil for a crispy exterior. Just ensure to keep the heat medium so they cook through without burning.
4. What’s the best way to reheat piroshki?
Reheating in the oven is ideal. This keeps the crust crispy. Place them on a baking sheet and heat at 375°F for about 10-12 minutes.
Conclusion
Beef and cabbage piroshki are a versatile, delightful treat that brings a taste of Russian comfort food to your kitchen. Whether you’re serving them at a party or enjoying them with a simple side, these pastries are sure to be a hit.
By following this recipe and incorporating the tips and variations, you’ll have a delicious homemade dish that stands out in flavor and presentation. Enjoy your culinary adventure!

